I remember the first time I heard that faint hissing sound coming from the bathroom. I ignored it for a day, maybe two. Then the water bill arrived. That’s when I learned the hard way: a running toilet isn’t just annoying—it’s pouring money straight down the drain. And don’t get me started on the tiny puddle that appeared near the base a week later, right before guests came over.
The good news? You don’t need to be a plumber to fix either of these problems. Most running toilets and minor leaks take less than 20 minutes to repair, cost under $15, and need just a couple of basic tools. In this guide, you’ll learn exactly how to diagnose and fix the most common toilet issues—starting with the ones that waste the most water and cause the most panic. I grew up around plumbing fixes—my dad was a plumber, and he taught me early on that most toilet problems are simpler than they look. A few of his hard-won lessons stuck with me.
Why Fix It Yourself?
Toilet repairs are one of those rare home tasks where the fix often sounds harder than it is. A running toilet can silently leak 200 gallons a day. A puddle at the base can rot your floor and ruin the ceiling below. Yet nine times out of ten, the culprit is a cheap rubber part that’s designed to be replaced. If you can turn off a valve and use a screwdriver, you can handle this. Toilet fixes are just the start. If you’re settling into a new place, check out these essential DIY home repairs every new homeowner should know.
How Your Toilet Works (in About 30 Seconds)
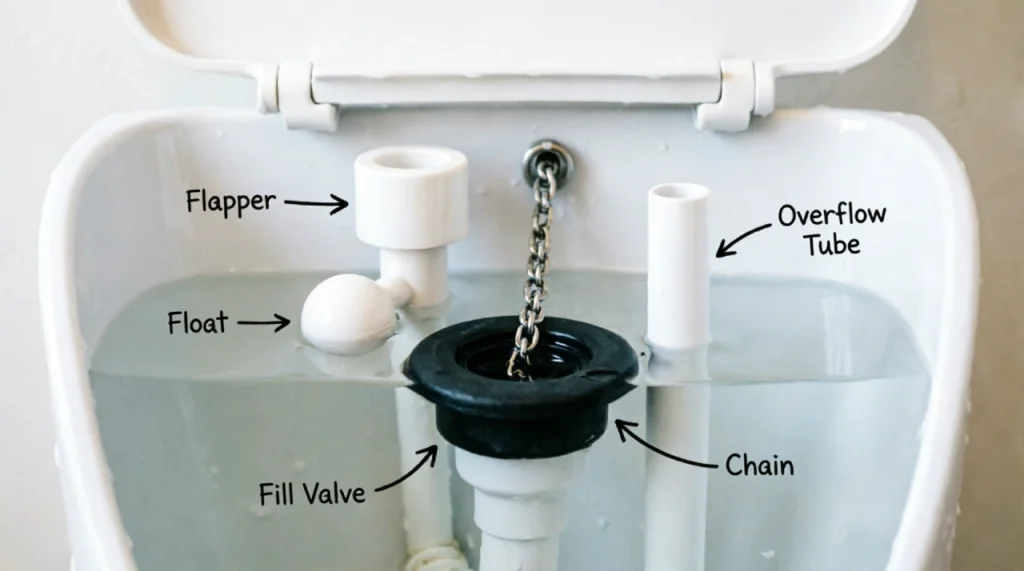
You don’t need a plumbing degree. Pop the lid off the tank and flush while watching what moves. Here’s the quick version:
- You press the handle, which lifts a chain.
- The chain pulls up the flapper, releasing water from the tank into the bowl.
- Once the tank is empty, the flapper drops back down to seal it.
- The fill valve kicks in to refill the tank, and a float shuts it off at the right level.
That’s it. Almost every running or leaking problem traces back to one of those few parts: the flapper, the chain, the fill valve, or the seals.
Before You Open the Toolbox
A few quick safety moves make the whole job safer and cleaner.
- Shut off the water. The valve is usually on the wall or floor behind the toilet. Turn it clockwise until it stops.
- Flush once to drain most of the water. Sponge out the rest from the tank if you need it completely dry.
- Protect the floor. Lay down an old towel or a shallow tray. Even an empty tank drips.
- Grab these tools: adjustable pliers, a flathead screwdriver, and maybe a small wire brush. If you’re replacing parts, keep a measuring tape handy—you’ll need to know whether your flush valve is 2 or 3 inches.
Pro tip: Take a photo of the inside of your tank before you remove anything. It’ll save you when you’re trying to remember which way the flapper chain hooks on.
Fix a Running Toilet—Stop That Nonstop Water Sound
A toilet that keeps running means water is either sneaking past the flapper or the fill valve isn’t shutting off properly. Here’s how to pinpoint and fix it, starting with the most likely cause.
The Flapper Check (60-Second Test)
Press down on the flapper with your fingers. If the running stops immediately, the flapper isn’t sealing. Replace it.
Even if the flapper looks okay, rubber warps over time. Buy a new one—they’re about $5 to $10—and make sure it’s the right size. Two-inch and three-inch are the most common. Match your old one or measure the opening in the bottom of the tank.
Installation: Unhook the chain, slide the flapper off the overflow tube ears, and pop the new one on. Reattach the chain with about half an inch of slack. Too tight and it won’t seal; too loose and the flush will be weak.
Chain Problems
If the chain is too short, the flapper never fully closes. Too long, and it can snag underneath, holding the flapper open. Adjust the clip so there’s just a tiny bit of play when the flapper is down. No special tools needed.
When the Fill Valve Won’t Shut Off
If the flapper’s new and the tank still runs, watch the water level. It should stop about half an inch below the top of the overflow tube (that open pipe in the middle). If it rises above that and trickles down the tube, the fill valve isn’t shutting off.
Most fill valves have a float you can adjust. On older models, you bend a metal arm. On newer ones, you pinch a clip and slide the float down. If adjusting doesn’t stop it, a new fill valve costs $15 to $20 and comes with clear instructions. You can replace it in 15 minutes without touching the toilet bowl.
Fix Toilet Leaks—When Water Escapes the Tank or Base
Leaks show up in three main spots. Each has its own fix.
Leaking at the Tank-to-Bowl Connection
If you see water dripping from between the tank and the bowl when you flush, the gasket is likely worn.
- Tighten the tank bolts carefully—alternate sides a little at a time. Don’t overtighten, or you’ll crack the porcelain.
- If tightening doesn’t work, you’ll need a new tank-to-bowl gasket. Shut off the water, empty the tank, disconnect the supply line, and unbolt the tank. Replace the gasket (often included in universal repair kits) and reassemble.
If you have a one-piece toilet, you won’t have this seam, so leaks here aren’t possible. Always check if your toilet is one-piece or two-piece before buying a kit—many universal kits only fit two-piece models.
Water Pooling Around the Base
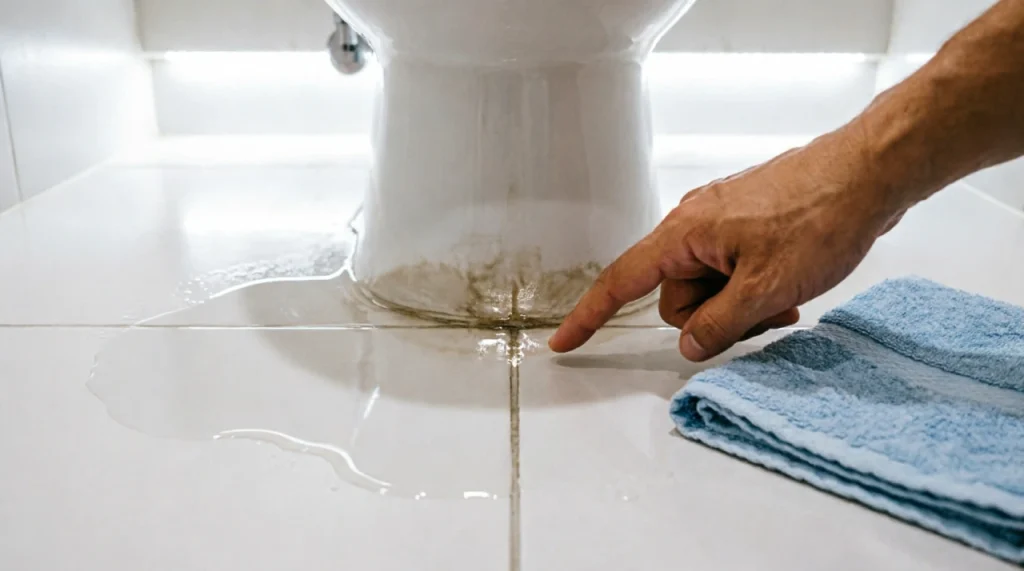
Water at the base is usually a sign the wax ring seal under the toilet has failed. This job is a bit more involved because you have to lift the toilet.
- Shut off the water, disconnect the supply line, and unbolt the toilet from the floor.
- Rock the toilet gently to break the wax seal, then lift it straight up and set it on its side on a towel.
- Scrape off the old wax, install a new wax ring (or a rubber alternative), and carefully set the toilet back down, pressing to compress the seal.
- Retighten the bolts just enough to hold the toilet firm—not enough to crack the base.
If you’re not comfortable lifting a toilet, this is the one repair where calling a plumber makes sense. A misaligned ring will leak again.
Dampness Around the Supply Line
Check where the flexible supply line connects to the fill valve. If it’s damp, try tightening the nut a quarter turn. If it still seeps, the rubber washer inside the line may be shot. Replace the supply line (under $10) by unscrewing the old one and attaching the new one. No thread tape needed—these use rubber seals.
The 5-Minute Silent Leak Test
Not all leaks make noise. If your toilet “ghost flushes” or your water bill crept up without explanation, try this simple test.
Put a few drops of food coloring in the tank. Don’t flush. Wait 10 minutes. If colored water appears in the bowl, you have a silent leak. Nine times out of ten, it’s the flapper. Replace it, and that invisible water waste stops.
Quick Reference: Other Common Problems at a Glance
| Problem | Likely Cause | Fast Fix |
|---|---|---|
| Weak flush | Low water level, clogged rim holes, loose chain | Adjust float, clean rim holes with a wire, tighten chain slightly |
| Toilet won’t flush | Disconnected chain, broken handle, clog | Reattach chain, tighten handle nut (reverse threaded), plunge |
| Toilet rocks | Loose bolts, uneven floor | Tighten bolts gently, slide plastic shims under base |
| Handle sticks | Mineral buildup, corroded arm | Clean handle area, replace if needed |
These aren’t the main focus, but they cover you for those “Oh, one more thing” moments.
When to Put Down the Wrench and Pick Up the Phone
You can fix the vast majority of running and leaking toilets yourself. But call a plumber if:
- The leak returns after a new wax ring.
- The toilet is cracked anywhere (hairline cracks grow).
- The floor feels spongy or soft—that suggests water damage underneath.
- You smell sewage or see water backing up.
Sometimes spending $150 on a service call saves you thousands in water damage.
Frequently Asked Questions
How do I know if my toilet is wasting water right now? Do the food coloring test described above. Also, listen for any hissing or the faint sound of water running after the tank should have stopped. An unexpected spike in your water bill is another red flag.
My toilet runs for a few seconds every hour—what’s up? That’s called a phantom flush. A tiny leak from the flapper slowly drops the water level until the fill valve kicks on to top it up. Replace the flapper, and the phantom stops.
Are “universal” repair kits really universal? Not always. They often fit standard two-piece toilets but may not work for one-piece models or brands with proprietary parts. Measure your flush valve size and check compatibility before buying.
Can I use a plunger for a leak? No. A plunger fixes clogs, not leaks. Leaks require replacing seals or tightening connections.
Final Thoughts
Fixing a toilet is one piece of keeping a home running smoothly. If you want a broader plan, grab our realistic home maintenance checklist—it covers the stuff that actually matters, room by room. I’ve wrestled with both running toilets and base leaks in my own home, and I’ll be honest—the worst part was the dread before actually opening the tank. Once I saw how simple the parts were, the fear evaporated. A running toilet is often a $5 flapper job. A small leak at the base is usually just a wax ring that’s past its prime.
You don’t need a plumber’s license. You just need to turn off the water, look inside, and replace what’s worn. Fix it fast, and you’ll save water, money, and the headache of a bigger repair down the road. Grab a screwdriver, and give it a go—you’ve got this.