I still remember the first time my kitchen faucet started dripping. I stood there frozen, already mentally dialing a plumber and watching my bank account drain. But then I opened the cabinet, stared at the pipes for a solid five minutes, and realized something: this wasn’t rocket science. It was a $2 piece of rubber.
That moment changed everything. I stopped calling handymen for every little thing, and I started actually understanding my home. If you just got your keys and the place still feels like someone else’s house, these five repairs will build your confidence fast. No fancy skills, no expensive tools — just simple fixes that work.
1. Stop a Leaky Faucet

A drip every second wastes over 3,000 gallons of water a year. That’s money literally going down the drain. Most leaks come from a worn-out washer or cartridge inside the handle, and replacing it takes less than 30 minutes.
Tools you’ll need:
- Adjustable wrench
- Flathead and Phillips screwdrivers
- Replacement washer or cartridge (bring the old one to the hardware store to match)
Step by step:
- Turn off the water supply valves under the sink. If there aren’t any, shut off the main water line for a few minutes.
- Open the faucet to let any remaining water drain out. Close the drain stopper so tiny screws don’t disappear.
- Pop off the decorative cap on the handle (often marked “hot” or “cold”), then unscrew the handle itself.
- Use the wrench to loosen the packing nut and pull out the stem. You’ll see a small rubber washer or a plastic cartridge at the bottom.
- Swap the old part for the new one. Reassemble everything in reverse order, turn the water back on, and test.
Safety first: If you feel resistance when loosening a nut, stop and apply a few drops of penetrating oil. Forcing it can crack old plumbing.
Pro tip: Take a photo of each step with your phone. When you’re putting it back together, a quick picture saves you from guessing which way a part faces.
2. Patch Small Drywall Holes
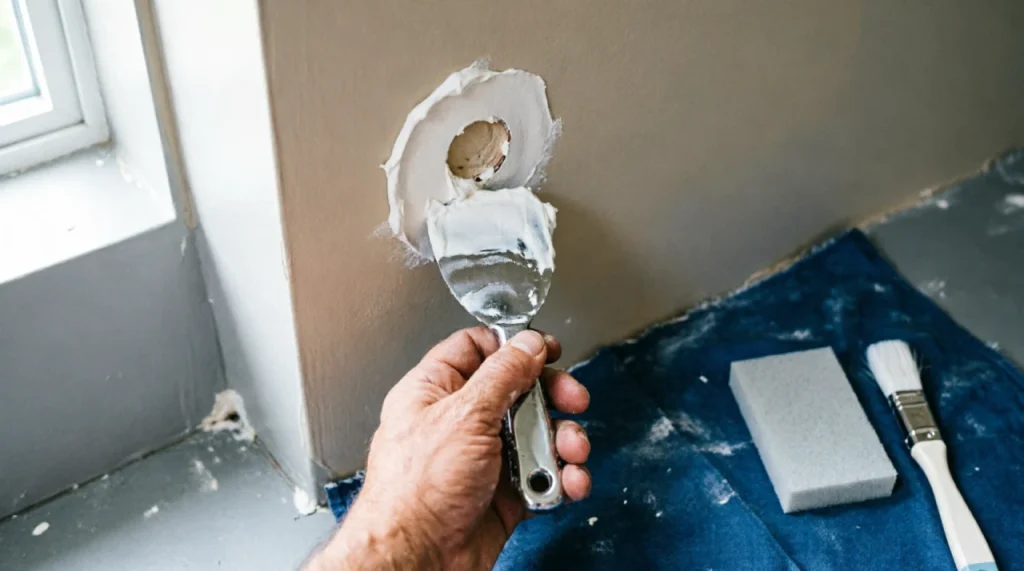
Moving furniture, removing old curtain rods, an overenthusiastic door stopper — small holes happen. But you don’t need to live with them, and you definitely don’t need to repaint the whole wall.
Tools you’ll need:
- Lightweight spackling compound
- Putty knife (2- or 3-inch)
- Fine-grit sanding sponge
- Sample-size paint in the wall color (most home stores match a chip)
Step by step:
- Clean the area around the hole and gently pick away any loose drywall paper.
- Scoop a little spackle onto the putty knife and press it into the hole. Scrape off the excess so the patch sits flush, not bulging out.
- Let it dry completely — usually 30 minutes to an hour, but check the label.
- Sand the spot smooth until it feels invisible to your fingertip.
- Dab on the matching paint with a small brush. Feather the edges outward so it blends with the surrounding wall.
Safety first: Wear a simple dust mask if you’re sanding old walls that might have lead paint (common in homes built before 1978).
Pro tip: For holes bigger than a quarter, use a peel-and-stick drywall patch underneath the spackle. It gives the compound something to hold onto and prevents cracking.
3. Replace a Broken Floor Tile
Cracked tile isn’t just ugly — it’s a tripping hazard and lets water sneak underneath. You can replace a single tile without redoing the whole floor, and the repair often becomes invisible.
Tools you’ll need:
- Hammer and cold chisel (or a flathead screwdriver you don’t mind abusing)
- Notched trowel
- Pre-mixed tile adhesive or thin-set
- Replacement tile (save leftovers when you move in)
- Grout and grout float (or just a gloved finger for one tile)
Step by step:
- Protect your eyes with safety glasses. Use the chisel and hammer to break the damaged tile into pieces, starting from the center. Work outward.
- Chip away the old adhesive from the subfloor until the surface is reasonably flat.
- Spread a thin layer of adhesive onto the floor with the notched trowel, then set the new tile firmly in place. Use spacers to keep the gaps even.
- Let it cure for the time recommended on the adhesive package (often 24 hours).
- Remove spacers, press grout into the joints, and wipe off excess with a damp sponge.
Safety first: Always wear eye protection when chiseling — tiny shards fly unpredictably. And if the tile is near a bathtub or shower, seal the edges with silicone caulk afterward to prevent water damage.
Pro tip: If you don’t have spare tiles, bring a broken piece to the store. Even if they no longer carry the exact shade, they can often order a near-match that no one will notice.
4. Unclog a Sink Drain Without Chemicals
Chemical drain cleaners eat at your pipes and rarely fix the real problem. A plunger and a basic drain snake clear most blockages safely, and the whole job takes less than 15 minutes.
Tools you’ll need:
- Sink plunger (flat-bottomed, not a toilet plunger)
- Drain snake or a plastic zip-it tool
- Baking soda and white vinegar (optional, but great for maintenance)
Step by step:
- Remove the sink stopper. If it’s a pop-up style, you can usually unscrew it from under the sink.
- If you have a double sink, seal the other drain with a wet rag. Fill the clogged side with an inch of water.
- Place the plunger over the drain and pump vigorously for 30 seconds. Lift — if water rushes down, you’re done.
- If not, insert the drain snake. Rotate it while pushing forward until you feel resistance, then pull back. You’ll likely hook a wad of hair and soap gunk.
- Flush with hot water for a full minute. Monthly, pour a half cup of baking soda followed by vinegar down the drain to keep it fresh.
Safety first: Never use a plunger right after pouring chemical cleaner — you risk splashing harsh chemicals onto your skin. Stick with mechanical methods first.
Pro tip: Before snaking, remove the P-trap (the curved pipe under the sink). Place a bucket underneath. Many clogs sit right there, and it’s easier to clean than snaking further down the line.
5. Clean Your Dryer Vent to Prevent a Fire
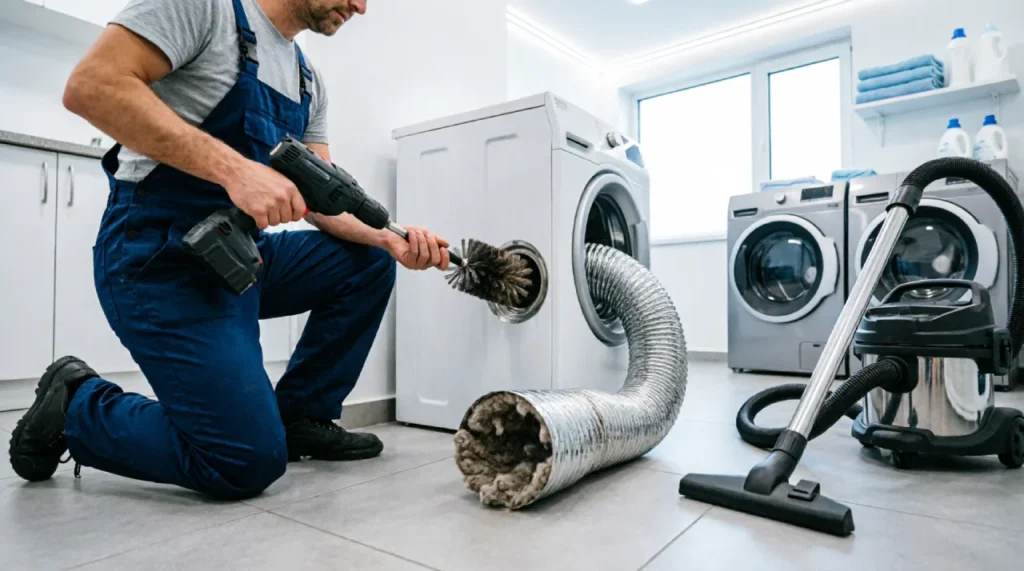
Your dryer works harder when the vent is clogged with lint. That means higher energy bills and a real fire risk. Cleaning the vent hose and the exterior outlet once a year is one of the most overlooked homeowner tasks.
Tools you’ll need:
- Vacuum with a hose attachment
- Dryer vent brush kit (costs about $20, fits a drill)
- Screwdriver to loosen the vent clamp
Step by step:
- Unplug the dryer and pull it away from the wall. If it’s gas, take extra care not to disturb the gas line — just slide slowly.
- Loosen the clamp on the vent hose and disconnect it. Look inside; if you see a thick layer of lint, you’ve already found the problem.
- Attach the brush to your drill and run it through the hose and the wall duct. Work from both inside and outside if you can.
- Vacuum up all loose debris. Reconnect the vent hose, tighten the clamp, and push the dryer back gently.
- Head outside and check the vent hood. The flap should open freely when the dryer runs. Clear any bird nests or debris from around it.
Safety first: If the vent hose is made of flexible white plastic, replace it with rigid metal or semi-rigid aluminum. Plastic traps lint and is a known fire hazard.
Pro tip: After cleaning, run the dryer empty for five minutes on the “air fluff” or no-heat setting. This blows out anything you loosened but missed.
Know When to Call a Pro
DIY pride shouldn’t override safety. If a repair involves main gas lines, major electrical panels, or a plumbing stack that runs through multiple floors, step back and pick up the phone. You’re not failing — you’re being smart. A $150 service call is still cheaper than fixing a flooded basement. And when you’re ready to stay on top of things before they break, use a simple home maintenance checklist to keep your entire house in check all year.
Frequently Asked Questions
What basic tools should every new homeowner have?
Start with an adjustable wrench, a 4-in-1 screwdriver, a putty knife, a plunger, a utility knife, and a cordless drill. Add tools as specific projects come up. You’ll build a reliable kit without overspending.
How do I find my home’s water shut-off valve before a leak happens?
Look near the water heater, in a crawl space, or along an exterior wall. Tag it with a bright label. When a faucet breaks, you don’t want to be searching while water sprays.
Can I use the same spackle for large holes and small nail holes?
For anything bigger than a quarter, use a patch or joint compound instead of lightweight spackle. Spackle shrinks a bit as it dries and works best on small imperfections.
Why does my toilet lever keep breaking?
Usually the chain attached to the flush lever is too short or tangled. Check inside the tank first. A toilet repair kit (under $15) replaces the whole internal assembly if needed.
How often should I clean my dryer vent?
At least once a year. If you dry multiple loads per week or have pets, bump that to every six months. A clogged vent is silent but dangerous.