I’ll never forget the first time I heard my toilet running. It was 2 AM, and that faint hiss-drone sound kept pulling me out of sleep. I figured it was nothing. A month later, my water bill arrived—$40 higher than usual. That’s when I learned that a worn-out flapper can waste up to 200 gallons of water a day. All because of a $10 rubber part I could have swapped in 15 minutes. If you’re new to fixing things around the house, this is one of the most approachable essential DIY home repairs to start with.
If you’re reading this, you’re probably hearing that same sound right now. Or maybe your toilet keeps cycling on and off every few minutes. Either way, I’m going to walk you through exactly how to fix it. No plumbing experience required. No special tools. Just you, a new flapper, and about a quarter of an hour.
First Things First: Is It Actually the Flapper?
Before you buy anything, let’s make sure the flapper is really the problem. The flapper is that rubber seal at the bottom of your toilet tank. When you flush, it lifts up to let water rush into the bowl. Then it drops back down to seal the tank so it can refill.
Over time, that rubber stiffens, warps, or just doesn’t sit flush anymore. When that happens, water keeps leaking past it into the bowl. The tank level drops, and the fill valve kicks on to top it off. That’s the hiss-and-refill cycle you’re hearing.
Here’s a quick test that takes two minutes and costs nothing.
The Food Coloring Test
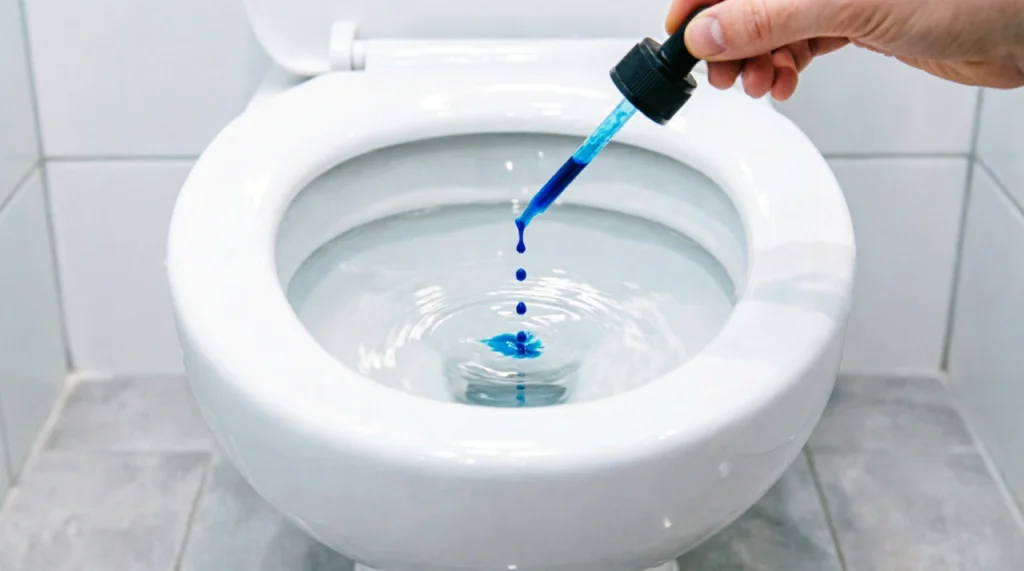
Grab some food coloring from your kitchen. Put a few drops into the tank—not the bowl. Wait 15 to 20 minutes without flushing. Then check the bowl.
If you see color in the bowl, water is leaking past the flapper. That means it’s time for a replacement.
If the tank water keeps rising into the overflow tube instead, that’s a fill valve or water level issue. Not the flapper. (I’ll point you to a guide for that at the end.)
Choosing the Right Flapper (This Is Where Most People Go Wrong)
Here’s the thing: flappers are not one-size-fits-all. Grabbing the wrong one is the number one reason a “fixed” toilet keeps running. So let’s get this right the first time.
Size Matters: 2-Inch vs 3-Inch
Replacement flappers usually come in two sizes: 2-inch and 3-inch. You match them by measuring the flush-valve opening at the bottom of the tank.
Most older toilets use 2-inch. Many post-2010 high-efficiency toilets use 3-inch. No tape measure? Here are two quick shortcuts: A 2-inch opening is about the size of an orange or a baseball. A 3-inch opening is about the size of a grapefruit or a softball. And here’s what my dad the plumber taught me—bring the old flapper to the store. It’s the only way to be 100% sure you’re getting the right match.
No tape measure? Here are two quick shortcuts:
- A 2-inch opening is about the size of an orange or a baseball.
- A 3-inch opening is about the size of a grapefruit or a softball.
Or just measure the old flapper itself end to end. A flapper roughly 3 inches wide means you need a 2-inch flapper. One roughly 4 inches wide means you need a 3-inch flapper. That little trick saves a ton of confusion.
Brand Compatibility
Some toilets use proprietary flapper designs. Kohler canister-flush toilets, certain American Standard models, and some Toto designs don’t use a standard flapper at all. They need the brand’s specific part.
The safest move? Bring the old flapper with you to the store. Or note the toilet brand and model stamped inside the tank.
A universal red-rubber flapper from Korky or Fluidmaster fits most standard 2-inch toilets. But if you have one of the exceptions above, “universal” might not work.
Mounting Type
One more thing: check how your flapper mounts. Most have two small ears that snap onto pegs on the sides of the overflow tube. But some designs use a ring or collar that slides down over the tube instead.
Note which type you have before you shop. A universal flapper usually supports both, but knowing yours saves a second trip to the store.
Tools and Materials
Here’s the good news: you don’t need a wrench, a screwdriver, or any fancy plumbing gear. For a flapper-only swap, everything clips on and off by hand.
You’ll need:
- The correct replacement flapper (you just figured that out)
- A sponge or rag and a small bucket (for the little bit of water left in the tank)
- Gloves (tank water is harmless, but it’s not exactly pleasant either)
- A few drops of food coloring (to test when you’re done)
That’s it.
Step-by-Step: How to Replace a Toilet Flapper
Let’s get to it. Follow these steps in order, and you’ll be done before you know it.
Step 1: Shut Off the Water
Locate the shut-off valve behind the toilet—it’s usually a small oval or football-shaped handle. Turn it clockwise until it stops.
Flush the toilet to empty the tank. Then sponge out the inch or so of water left at the bottom so you can work dry.
Step 2: Remove the Old Flapper
Unhook the lift chain from the flush handle’s arm. Then unclip the flapper’s ears from the pegs on the sides of the overflow tube. If yours has a collar, slide it off the tube.
It comes off by hand. No force needed.
Step 3: Clean the Flush-Valve Seat
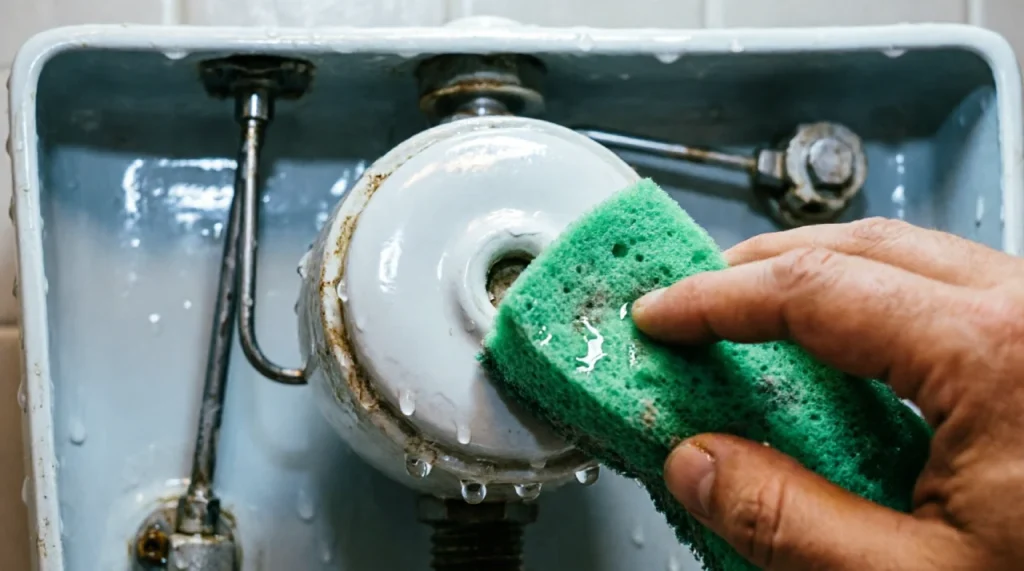
This is the step most people skip. And it’s exactly why a brand-new flapper sometimes still leaks.
The seat is the rim the flapper presses against. Over time, sediment and mineral scale build up on it. Wipe it with a rag. If there’s hard mineral buildup, gently smooth it with fine-grit emery cloth, then rinse the debris away.
A clean seat means a proper seal.
Step 4: Install the New Flapper
Clip the new flapper’s ears onto the same pegs (or slide its collar over the overflow tube). Make sure it sits flat and centered over the opening.
Step 5: Set the Chain Slack
Hook the chain to the handle arm with about 1 to 2 links of slack.
- Too loose: the flapper won’t open fully when you flush.
- Too tight: it can’t fully close and seal.
The flapper should rest flat when closed and start lifting the instant you press the handle.
Step 6: Turn the Water Back On and Test
Turn the shut-off valve counterclockwise to restore water flow. Let the tank refill.
Do a normal flush. Watch the flapper drop and seal. Then run the food coloring test again. No color in the bowl after 15 minutes means you’re good to go.
Common Mistakes to Avoid
I’ve seen these trip up plenty of DIYers. Learn from them.
Wrong size or brand. This is the #1 cause of a still-running toilet after a flapper swap. Double-check your measurements and compatibility.
Chain too tight or too loose. Either one breaks the seal or prevents a full flush. Stick to that 1-2 links of slack.
Skipping the seat cleaning. A new flapper can’t seal against a gritty or scaled seat. Take the extra 30 seconds.
Mistaking a fill-valve problem for a flapper problem. If water keeps rising into the overflow tube, that’s the fill valve or water level, not the flapper.
Using in-tank bleach tablets. Those drop-in tablets degrade rubber flappers (and other parts) and can even void manufacturer warranties. They’re a leading cause of premature flapper failure. Stick to in-bowl cleaners instead.
What If It Still Doesn’t Work?
You replaced the flapper, but the toilet is still running. Don’t panic. Check these in order:
- The flush-valve seat is damaged. If it’s pitted or cracked, no flapper will seal against it. That may require a flush-valve replacement.
- The fill valve or water level is off. Water trickling into the overflow tube points here, not at the flapper.
- You have a canister-flush toilet. If your tank has a tall central tower rather than a hinged flapper, it uses a canister seal—a different part.
A flapper swap itself is firmly DIY. There are no tank bolts to loosen and nothing to over-tighten. Call a plumber only if the repair grows—like a corroded shut-off valve that won’t close, a cracked flush valve that requires removing the tank, or brittle old plastic you don’t want to force. If you’re dealing with any other toilet issue, check out our toilet repair guide for step-by-step fixes on every common problem.
How to Make Your Flapper Last Longer
A quality flapper typically lasts about 5 to 10 years. Hard water and in-tank chlorine tablets shorten that considerably.
Here’s how to get the most out of your new flapper:
- Skip the in-tank bleach tablets. Use in-bowl cleaners instead.
- Check the water quality. If you have hard water, consider a water softener to reduce mineral buildup.
- Inspect it once a year. A quick visual check can catch wear before it becomes a leak.
Frequently Asked Questions
How do I know if my flapper is bad?
Do the food-coloring-in-the-tank test. If color appears in the bowl within 15 minutes, the flapper is leaking.
What size toilet flapper do I need?
Measure the flush-valve opening at the bottom of the tank—about 2 inches or about 3 inches. Most older toilets are 2-inch; many newer high-efficiency toilets are 3-inch.
Are toilet flappers universal?
Mostly, for standard 2-inch toilets. But 3-inch valves, Kohler canister toilets, and some Toto/American Standard designs need the specific part. Match the size and brand.
Why is my toilet still running after I replaced the flapper?
Usually the wrong size or brand, a chain set too tight or loose, or a dirty or damaged valve seat. If water rises into the overflow tube, it’s the fill valve, not the flapper.
How much does a toilet flapper cost?
A universal flapper runs about $5 to $15. Brand-specific or canister seals can cost a bit more.
You Just Fixed Your Toilet
Seriously—give yourself a pat on the back. You just saved money on your water bill, stopped that annoying sound, and handled a home repair that plenty of people pay a plumber $100+ to do.
If you’re still not sure the flapper was the culprit, check out our full running toilet guide. It walks through all six common causes so you can diagnose with confidence.
And if you’ve got other toilet troubles, the toilet repair guide breaks down every symptom and fix.